Magnific-Style Upscaling with Open Models: How to Add Detail When You Upscale (2026)
Updated November 12, 2026
Magnific-style upscaling means enlarging an image while adding new detail, instead of only sharpening what is already there. Diffusion-based upscalers do this by generating fine texture that matches the image, which suits AI art, renders, and concept work. cnaps studio runs two open diffusion upscalers built for this, FiDeSR and CODSR, alongside four faithful upscalers, all on the free plan. You can run the same image through several of them and pick how much invented detail you want.
This guide explains how creative upscaling differs from faithful upscaling, which open models to use, how to set them up, and what a real run looked like.
Creative upscaling vs. faithful upscaling
Faithful upscalers enlarge the pixels that are there and sharpen edges. The result stays close to the source, which is what you want for product photos, logos, and anything where accuracy matters.
Creative upscalers use a diffusion model to add detail the source only suggested: stone texture on a wall, individual blades of grass, weave in fabric. The result looks richer at full size, and it can also drift from the original in small ways.
Neither is better in general. The right choice depends on whether the image needs to stay exact or needs to look finished at a size it was never made for.
Open models for creative upscaling
| Model | Type | Use it for |
|---|---|---|
| FiDeSR | One-step diffusion upscaler | Added detail that stays close to the source |
| CODSR | One-step diffusion upscaler | The most added texture, for art and renders |
| PiSA-SR | Diffusion-based upscaler | Extra texture on fabric, foliage, and compressed images |
| Swin2SR | Faithful upscaler | Clean enlargement without invented detail |
| SMFANet+ | Faithful upscaler | Fast enlargement for large batches |
| SwinIR | Faithful upscaler | 3x and 8x for very small sources |
FiDeSR and CODSR both upscale in a single diffusion step. CODSR offers 2x and 4x, with 4x adding the most detail and taking the longest. PiSA-SR sits between creative and faithful. Swin2SR, SMFANet+, and SwinIR are there for the images that should stay exact.
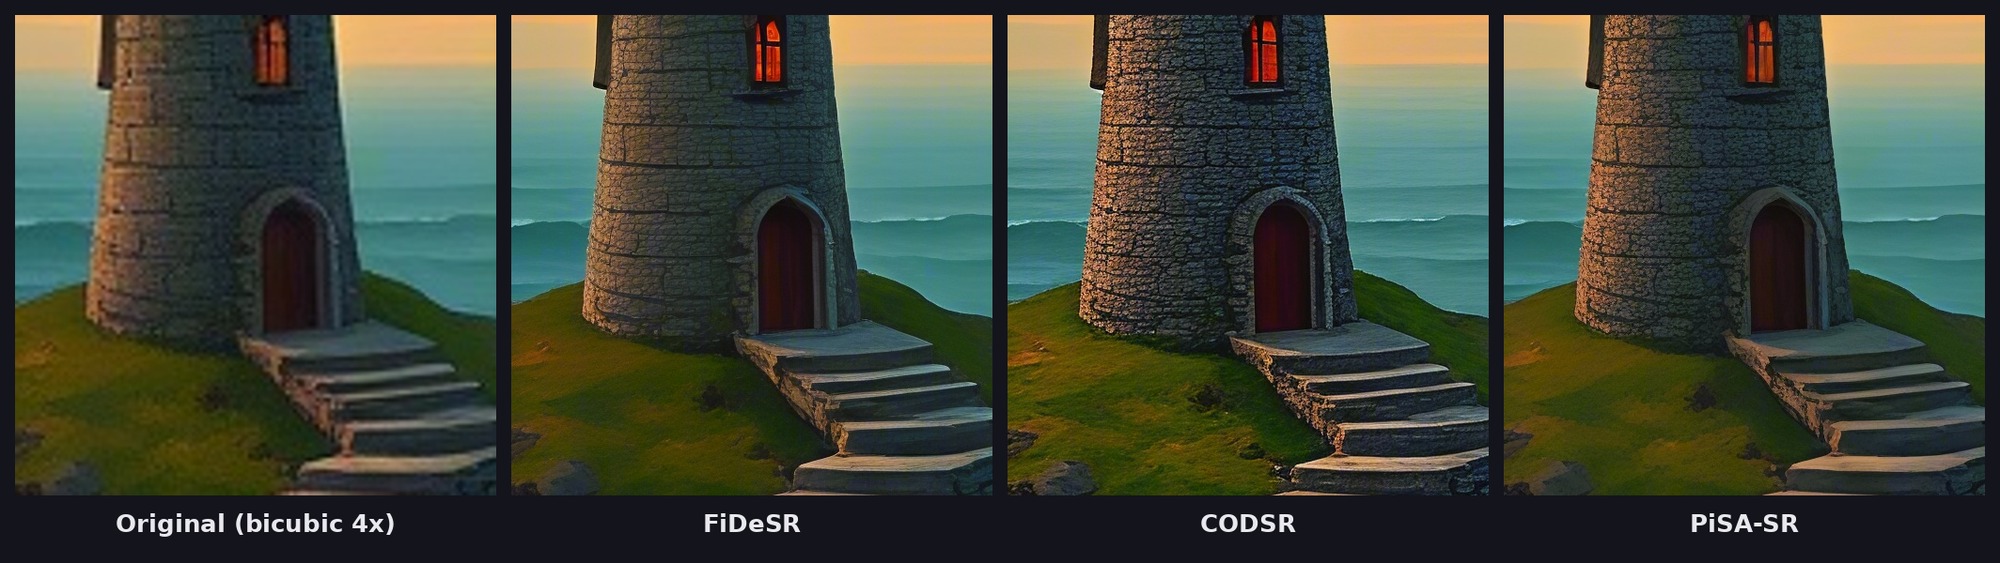
The three land at different points between faithful and inventive. PiSA-SR keeps the painterly look of the original with cleaner edges. FiDeSR draws crisp mortar lines into the stone while staying close to the source. CODSR invents the most, adding rough stone texture and individual blades of grass that the original only suggested.
Try creative upscaling in cnaps studio →
How to do it in cnaps studio
- Add the image you want to upscale, or generate it first with an image model in the same flow.
- Connect two or three upscalers. A useful starting set is CODSR, FiDeSR, and Swin2SR, which covers the range from most invented to most faithful.
- Choose the scale. On CODSR, use 4x for the most added detail, or 2x when you want a lighter touch.
- Run and compare the outputs in Image Compare at 100% zoom, on the parts of the image with the most texture.
- Save the flow with the model you chose, so the next image gets the same treatment.
Tips for creative upscaling
Start small. Diffusion upscalers have more room to add detail when the source is small, such as a 512 or 1024 pixel AI image.
Check faces, hands, and text. These are where invented detail is most noticeable. If they matter, compare against a faithful upscaler before choosing.
Generate and upscale in one run. For AI art, put the image generator and the upscaler in the same flow, so one run produces the final full-size file.
Upscaling a whole set
Once you have picked a model, a saved flow gives every image the same look. Batch Run, available from the Starter plan, sends a whole folder through it, and the flow can be called through the API or MCP, for example from Claude. For a broader comparison of upscaling tools, see our Magnific AI alternatives guide.
The free plan includes all six upscalers, runs one job at a time, and watermarks output. Paid plans start at $20 a month with Starter, which removes the watermark and adds Batch Run.
Try creative upscaling on cnaps studio and compare creative and faithful results on your own image.
FAQ
Which cnaps studio upscalers add new detail?
FiDeSR and CODSR are one-step diffusion upscalers that generate fine detail while upscaling, and CODSR adds the most texture. PiSA-SR adds texture on fabric, foliage, and compressed images. Swin2SR, SMFANet+, and SwinIR stay closest to the source and mainly sharpen what is already there.
Is creative upscaling free on cnaps studio?
Yes. FiDeSR, CODSR, and the other four upscalers are on the free plan. Free output carries a watermark and runs one job at a time. Paid plans start at $20 a month with Starter, which removes the watermark and adds Batch Run.
Should I use 2x or 4x with CODSR?
Use 4x when you want the most added detail from a small source, such as a 512-pixel AI image. Use 2x for a lighter touch or a larger source. 4x takes longer and uses more GPU memory, so try 2x first on large images.
Can I generate an image and upscale it in one step?
Yes. Put an image generator and an upscaler in the same flow and run it once. The generator creates the image at its native size, and the upscaler enlarges it with added detail, so one run produces the final full-size file.
